
Rachael Sprot gives her guide to making the best of a tricky anchorage to ensure you have peace of mind when you drop the hook
When dropping the hook, identifying a good anchorage is half the battle. The better-known spots are in the pilot guides, but you needn’t limit yourself to those. The key things you’ll need to consider when identifying the suitability of an anchorage are:
Shelter
For open anchorages, an offshore breeze for the duration of your stay is essential, as well as protection from the sea and swell. Check the forecast for wind shifts which could turn a secluded cove into a dangerous lee shore. The character of tidal anchorages can change through the cycle. As well as the change in stream, the shelter varies as things like rocky ledges, which can form natural breakwaters, cover and uncover.

Choosing an anchorage: Devon’s Hope Cove with a south-westerly swell coming around Bolt Tail
Nature of the seabed
Sand and mud give the best holding as long as they aren’t too soft. Weed and rock should be avoided.
The visible coastline can indicate what’s going on under the surface. Rocky outcrops on shore may extend to seaward, as might the stretch of sand between them, so try to position yourself in that. Sand reflects more light than kelp or rock, so drop the anchor into those paler patches.
The satellite view on Google Maps is also invaluable: save screenshots of likely anchorages to your phone or tablet prior to departure. Smooth contours suggest sand, while rocky bottoms are more irregular.

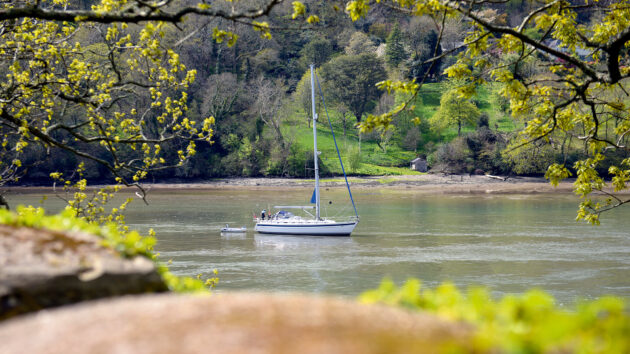
You’ll lie three different ways in a tidal cycle: to the flood, the ebb and to the wind – your anchor position needs to take all three into account. Photo: Nic Compton
Depth
Consider both high and low water. The length of chain and warp you carry limits the depth you can successfully anchor in.
A 4:1 ratio gives a decent scope on chain, and you need 6:1 for warp.
It’s imperative to know the height of tide when you arrive so that you can factor the rise and fall of tide into your choice of spot.
The minimum depth to anchor is:
Draught + Clearance + Fall Of Tide
The clearance you choose depends on the conditions. In soft mud 0.5m clearance between your keel and the seabed may be adequate, but on a rocky bottom you’ll need more.

As the tide ebbed around Anchor Stone on the Dart, Wimsey swung in the eddies. Photo: Nic Compton
Swinging room
Finally, you’ll need to consider swinging room. You can’t do this until you know roughly what depth you’ll have, and how much chain to lay out.
Our example boat, the Malo 46 Wimsey, has a 2.1m draught and we chose a 1m safety clearance. Using the tidal curve we calculated that the height of tide was 3.9m. We were an hour after high water, and the tide would fall to 0.2m above chart datum giving a fall of tide of 3.7m. So we would need 29m chain.

The boat is held on the edge of the channel, anchored fore and aft. Photo: Nic Compton
Depth gain (3.9m to 4.3m) is 0.4m
+ Current depth of 6.8m
= 7.2m max depth
x Scope of 4:1 = 28.8m (29m) of chain
The radius of the swinging circle is marginally less than the length of chain that’s out, 28m, plus the length of the boat. So 28m chain plus 15m LOA = 43m radius from the anchor point.
However bear in mind that most of the time the chain doesn’t pull tight. If it does pull taut in strong conditions this tends to be only in one or two directions. It would be very unusual to do a full orbit of your anchor at maximum extension.

A stowage box or bag can help organise the chain on deck. Photo: Nic Compton
Second anchors
A second anchor is useful where swinging room is restricted, to keep the boat head to the swell in a rolly anchorage or to stop the boat yawing about. A kedge can be rigged from the bow (Bahamian moor) or the stern depending on what suits the vessel and conditions. In this example we took the kedge astern to keep Wimsey truly fore and aft on the edge of the channel while anchoring in a pool near Higher Gurrow Point on the River Dart.
If you’re using a second anchor to take the full weight of the vessel, which we would have done in this instance when the tide reversed, then it needs to be as well set as your main anchor and with good holding power. It’s acting as the primary anchor at this point and you won’t get good results if the anchor is undersized or if there’s little or no chain on it.
Wimsey’s kedge is a 20kg Danforth with 20m of chain and 20m of warp, so it isn’t as good as the main anchor and we wouldn’t have relied on it in strong conditions.

Flake the chain, and then the warp, down into the dinghy, preferably into a container. Photo: Nic Compton
How to set a kedge from the dinghy
- Set the main anchor.
- Attach a buoyed trip line to the kedge, long enough to be afloat at high water, but short enough to stay close to the anchor.
- Attach enough warp to get the anchor into the position you want.
- The dinghy will struggle to reverse against the weight of heavy chain, so use a long line to allow the dinghy to drop back. You may need to bend on additional length of line temporarily in order to achieve this.
- Flake the warp on the transom and attach one end to a cleat or winch.
- Flake the chain into the bow of the dinghy with the anchor on top.
- Make sure the boat is sitting well back on her main anchor. Leave the engine in tick-over astern if the conditions don’t do this for you.
- Drive the dinghy astern until you’ve reached the position for the kedge.
- The warp should run freely from the transom.
- Drop the anchor over the side of the dinghy and feed the chain over afterwards.
- Take up on the warp in the cockpit and make fast – there should be plenty of scope.

Take up on the kedge so the yacht is roughly equidistant between the two anchors. Photo: Nic Compton
How to set a kedge without a dinghy
If the anchor chain is long enough, you can deploy the kedge without a dinghy:
- Flake the kedge and chain on the transom of the yacht, with the anchor end up. Attach the bitter end to the boat.
- Ease out an extra 20-40m of chain on the bow anchor and reverse the boat.
- Drop the kedge and pay out the chain.
- Take up on the main anchor until you’re back in the original position.

Use a light line to temporarily extend the kedge warp while setting the anchor. Photo: Nic Compton
Bahamian Moor Variation
The disadvantage of a fore and aft configuration is that if conditions change and the boat lies beam on to the wind, there will be a big load on both anchors.
Anchoring to a bow anchor works well because the boat can move with the elements. If you restrict the boat, the risk of dragging increases. The Bahamian moor allows the boat to swing freely while still tethering it into a single position.
- Start by deploying the first anchor and dropping right back on it.
- Deploy the second anchor immediately down tide, either from the dinghy or transom.
- Lead the kedge to the bow and take up on the main anchor to centre the boat.
- You can join the chains together before lowering another few metres to keep the lines clear of the keel. Running the kedge line through a snap block will allow you to tension the anchors against each other.
The drawback of the Bahamian moor is that there’s the potential for the yacht to turn 360°, twisting the anchor chains around each other. If this happens, you’ll need to undo one of them and unwind the chain.

The dinghy crew approach the buoyed trip line to recover the kedge anchor. Photo: Nic Compton
Retrieving a second anchor
If the dinghy crew haven’t mutinied yet, they can use the trip line to pull it up. This is difficult on boats over 40ft, however, due to the weight involved. A couple could manage this on Wimsey, but only just.
Alternatively, buoy the bitter end of the kedge anchor chain and release it. Take up the main anchor. Return to the kedge and haul it up over a second bow roller, using the windlass if possible (you’ll have to take the main anchor chain off the gypsy to do this).

When recovering the anchor use a fender, board or cloth to protect the dinghy’s topsides, or recover using the yacht’s windlass. Photo: Nic Compton
Trip lines
I’ve never liked trip lines and only use them on the kedge. In my experience they wind themselves around the chain causing more problems. All the same, on rocky bottoms or in the vicinity of coral it can be worth using one.
A fender on a line slightly longer than the maximum expected depth will keep the buoy above the anchor. Don’t use floating line as this could end up fouling your propeller.
 If you enjoyed this….

Yachting World is the world’s leading magazine for bluewater cruisers and offshore sailors. Every month we have inspirational adventures and practical features to help you realise your sailing dreams.Build your knowledge with a subscription delivered to your door. See our latest offers and save at least 30% off the cover price.